I’ve finally committed to making my first blog entry about my LTO (Linear Tape-Open) journey, and it’s coincided with revisiting my Daft Punk albums so forgive the Technologic inspired chapter titles! With grateful thanks to all those who’ve encouraged this blog. I hope it’s helpful to some go-it-alone LTOers.
Disclaimer: I’m formerly a videographer and now colourist/asset manager at the Media Archive for Central England. I’ve no prior LTO experience so have had to learn on the fly. What follows will help illustrate my learning curve over the last few years, and I welcome feedback from more knowledgeable users.
This blog is broken into four sections:
- Buy it, use it, break it, fix it… Introduction
- Write it, cut it, paste it, save it… Admin requirements for non-library use
- Load it, mount it, quick, format it… Basic operations and command line
- Trash it, crash it, bash, reboot it… Errors and problems
Buy it, use it, break it, fix it…
1. Introduction
LTO was not designed to be used manually but as part of a large library system where robots access the tapes and software algorithms decide the location of your data, across multiple tapes. For small archives the pricing of library systems makes them fairly unattainable. Thankfully the desktop drive range and the Linear Tape File System (LTFS, launched in 2010) makes the technology available to all, but in place of the robots are fleshy operatives. LTFS works by allowing data to be copied to the LTO tape and can be read anywhere with open source LTFS software. It also provides indexes of the tape contents making the metadata searchable and more quickly recovered. LTFS can be used mounted on a desktop allowing items to be dragged/dropped to a tape, or controlled via command line instructions. I first was introduced to LTO/LTFS in 2015 as a way to handle incoming LTO6 tapes containing massive DPX scan folders from external agencies. The Apple MacPro 5,1 in our technical suite hadn’t the processing power to handle the DPX files, so we were gifted an ageing Ubuntu server complete with 9TB storage, FFMPEG, LTFS and a PCI SAS card to connect to an LTO drive. LTO6, which has an uncompressed tape capacity of around 2.4TB, was the affordable format at the time. LTO7 was on the horizon but waiting wasn’t an option, so a desktop Quantum LTO6 half height drive, Model B (below) was purchased.

I began moving 200-300GB DPX folders onto the Ubuntu using command line instructions — many of which follow below in this blog — before using FFMPEG to create a ProRes 4444 file from the image sequence (find out more about FFMPEG). This was transferred over a 1Gb server connection to the MacPro for grading and export to clients. Another PCI card with SAS connector* was ordered for the MacPro 5,1, and installed along with LTFS and the Quantum LTFS Manager software that provides a GUI for mounting and formatting LTO tapes. Following recommendations in the LTO manual we obtained a grounding wrist band to be worn when handling the drives/tapes in case of electrical charges being conducted through the body of the operator and shorting the equipment. [*Unknowingly, we ordered a different PCI SAS card to the one received, which I think may be responsible for many of the errors experienced in chapter 4.]
With the LTO deck operating, our archive developed a ‘submaster relocation’ workflow that would prioritise moving roughly 30TB of 2010-2014 era digitised AVI assets from ageing spinning disk infrastructure on to LTO tape. In the beginning these AVIs were rewrapped to uncompressed MOV using FFMPEG, but we now convert to FFV1 and Matroska to save transfer times and storage costs (you really need FFV1 in your life). I began writing the files to LTO6 tape using this single drive, writing two identical A & B tapes one after another, so that they could be safely stored in two different locations.

In 2017 we received funding to invest in a second half height tape drive from Quantum, commissioning a third party vendor to purchase it. We learnt too late that there is more than one model of Quantum LTO6 desktop drive. We already owned the model B, and the model C (right) came with our second investment. In addition we purchased a UPS to protect the LTO drives while copying in the unlikely event of power surges and unexpected power cuts, which sadly we have experienced on occasion. A new Hewlett Packard Z840 was installed with a PCI SAS, LTFS and a basic GUI LTFS Configurator used to load and format a tape. We had hoped to be able to mount both half-height drives to the Z840 so that we could write to two LTO tapes simultaneously but were told by the installation team that the model B and C devices couldn’t run alongside one another on Windows 10! This hasn’t been a major obstacle up to this point as we have two different LTO workflows that copy simultaneously from the Mac or Ubuntu, and from the Z840. It would be nice to run parallel copies in the future, but I suspect this isn’t feasible as the LTFS GUIs don’t appear to support multiple deck selection, unless there’s a way to connect two to the same 6Gb SAS Serial ATA connector.
Within our archive we write data that’s approx 99% audiovisual files and still image sequences to LTO, and 1% accompanying project files. We do not use any compression settings, and as a result I know very little about this. LTO6 can write up to 6TB of compressed files, and it is both worm and encryption capable, and you can have up to four partitions per tape. You can read more about these functions from the official half height Model C documentation at the Quantum website.
Finally, no one tells you how noisy these drives can be. I’ve measured a single drive at over 80 decibels using a phone app at close range. When you have them next to you in your edit suite it can make audio editing difficult – so you might want to think carefully about location and sufficient cabling, or buy a really good pair of noise cancelling headphones!
Write it, cut it, paste it, save it…
2. Administration for non-library use

Within a library system LTO tapes will have barcodes on the tapes to help the hardware/software locate and load them into the machines remotely. I’ve used a great website to generate my own equivalent barcodes for the tapes, printed onto regular paper sticker sheets (not recommended for libraries though) and stuck on the tape/case. The website is tapelabel.de. Any tapes written prior to instigating the barcode system mid 2017 were designated a prefix Z, and 2018 tapes were A, new 2019 tapes will be B. The number sequence grows with each new pair of tapes generated, so next tapes formatted will be B0057A and B0057B. We write identical content to two tapes which are marked in the last digit at A or B, and these are kept in two separate storage locations. Linear Tape File System (LTFS) tapes cannot be incorporate into all library systems, as they often have their own system architecture different to LTFS. However, StrongBox/Spectra Logic offer a library system which can incorporate LTFS tapes, so it is possible one day MACE may be able to incorporate these tapes into a library facility.

I created a couple of documents to help me structure and organise my LTO operations. These include a hand written Error Log book that details any problems and remedies I encountered with the operating systems, decks and individual tapes. This log also includes tape cleaning logs and firmware information. I’ve decided to run cleans if error codes request cleaning, or there are operational problems that suggest it would be of benefit. Dirt will get onto the heads, from the tapes themselves as they age, and from the general desktop environment. Cleaning the heads is necessary to avoid read/write errors and each drive you buy comes with one cleaning tape that is useable for up to 50 cleans, so logging your use is important. Never reuse cleaning tapes! Cleaning is simple, just put the tape in to the drive once powered on, and it will automatically begin a cleaning cycle. It will eject when the process is complete, after around two minutes. I’ve read that you should keep the cleaning tapes immaculate at all times, including not writing on the outside with a pencil, or anything else that could shed inside the machine.

In addition to the Error Log I have a CSV file that records details of each LTO tape. This includes: tape type (we’ve written to both LTO5 and LTO6); writable space available for the A and B tapes colour coded to highlight usability or size discrepancies; a description of contents; errors that may have occurred during the writing/reading processes; physical tape storage locations; any additional notes; and dates last mounted. With some earlier tapes there are quite dramatic size differences between identical tape copies, as a result of write failures. With earlier tapes I’d also delete AV assets (following write failures) and the item would be removed from the index and therefore be invisible to the mounted folder, but used space was not reallocated as writable. Having this quick reference has proven useful when revisiting tapes at a later date, when using up leftover tape space. This CSV has been particularly useful with the early LTO6 tapes received from external agencies. Each tape written seemed to be different, creating problems such as no allocated serial number or A & B copies with different contents on each (one tape containing linear scans and the other the log scans). This kind of information has proven difficult to map on our database system, highlighting the value of this CSV.
Finally, each LTO tape pair has a hand written list of contents included within the A case for quick reference. Probably an unnecessary step, but it has come in useful on a couple of occasion when an entry error has occurred with the database or with my filing system. The database precisely locates which LTO tape the digital asset is stored on, so these are really localised off-line back ups.
Load it, mount it, quick, format it…
3. Basic operations and command line
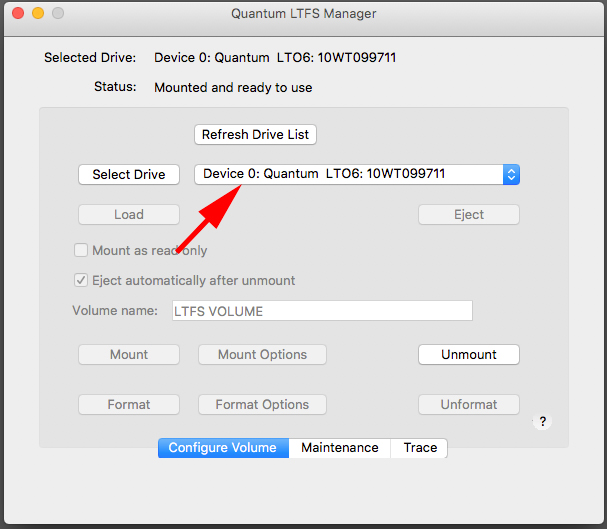
Powering up the drives takes just a couple of minutes. Plug in to the power source and the computer – all connections should be powered off when cables are attached to the tape drives including computers. Switch on the electrical sockets to the tape drive and power up the computer. Press and hold the power button on the front of the deck for a few seconds. The decks can take a couple of minutes to settle, making whirring and buzzing noises as it runs its launch checks. I wait until the drives are quiet and in ready mode – displaying a single green light – before launching the LTFS GUIs. You need to select the available tape drive (see above) from the GUI before making any further requests.
Loading
The tapes themselves should always be clean, free of dust and dirt before entering the tape drive. I keep a lint free cloth near to the drives for wiping tapes down prior to loading, if they need it. Also, make sure your tapes have acclimatised for at least an hour if they’ve been stored at a different temperature/humidity to where the drive is located. If you plan to format or write to a tape first make sure that the write protect button next  to spine label recess is slid open (see right). You can request that the GUI loads the tape into the device, or you can carefully push the tape into the drive yourself. For non GUI, you would use command line to mount the tape after manually pushing the tape into the machine:
sudo ltfs /dir_mnt/lto_folder
(sudo removable if you have admin privileges / bold indicates user changeable data). With the GUIs, irrespective of whether you’ve manually loaded the tape or not, I’ve found that you need to load the tape again in the software before you can move on to the next stage.
 Formatting
If you are loading a new LTO tape you will need to format it before mounting to desktop. After loading a new tape with the GUIs you’ll notice that the mount option wont be available and you’ll have to press the GUI Format button (see right) to begin formatting the tape. Make sure the tape has its safety switch set to open so you can write to it, and be prepared to supply a 6 digit serial number, and a long form name for the tape, if different. When formatting through command line you can supply a serial number, or long form name (see below). The following code is used to start the formatting process, and includes a no compression call to disable the compression function. Remove this if you want to compress items such as text documents.
sudo mkltfs –device=/dev/st0 –volume-name=“Example_LTO_name” –tape-serial=“A0001A” –no-compression
Applying the six digit serial is essential for integrating your tapes into LTO libraries. The 6 character alpha/numeric serial matches a barcode label, and once applied cannot be changed without reformatting the tape and copying again. This serial number is stored in multiple indexes and also inside the tape chip memory. [Note. See chapter 2 for a link to the barcode generation website I use to apply the serial numbers to the tapes. ]
Mounting
Once formatted you want to make sure that before hitting the ‘mount’ butting that the “Mount as read only” check box is unticked. This can sometimes carry over from a previous tape viewing, and it good practice to mount as read only if you just want to retrieve an item or view tape contents. Once mounted the tape will appear on the desktop and in directory listings.
Copying
Once the LTO tape is mounted I simply drag and drop a directory, or collection of AV assets from desktop to the LTO tape. Writing a full tapes worth of uncompressed AV assets is documented to take 4 and a half hours to LTO6. It made sense to me to wrap DPX folders which are full of many thousands of individual files, up to 50MB each in size for 4K. We adopted the TAR route following BFI standards without realising initially that their approach was developed for their library system. Following a few chats on AMIA List Serve I’ve learnt that TAR is not the best step for Linear Tape File Systems (LTFS), with alternatives such as BagIt, Zip or RAWcooked recommended and utilised by other institutions. I’ll be honest, I’m unsure of this reasoning, but I’m looking forward to changing to RAWcooked soon, which offers amazing benefits including lossless reductions in file size of up to 50% (read more about RAWcooked here).
If you’re non-GUI and want to use command line exclusively here are a few Ubuntu examples I’ve been given but haven’t needed to use, so I can’t verify them. I’ve heard it is better to use RSYNC or GCP for copying to LTO as they have more command options, better support and can be quicker. I haven’t tried any myself but haven’t ruled out testing RSYNC in near future, particularly as the ‘—partial’ command option allows you to resume copies that have ended half way through.
Check for space on the tape:
df -h /directory_mount_point/lto_folderList contents of the tape:
ls -l /directory_mount_point/lto_folderCopying to files or folders to the tape:
cp <file> /directory_mount_point/lto_folder
or
cp -R <copy_directory_name> /directory_mount_point/lto_folder
Make sure you visit AMIA Open Source LTFS Read me document which has many more helpful commands than these few above. In addition, I very recently discovered LTOpers which has bash scripts for LTO operations with LTFS. You can download from here, and with one short piece of code you can writelto, formatlto, mountlto, verifylto etc., all to archival standards. These were developed by leading digital preservation specialists and open source supporters Reto Kromer and Dave Rice, highly recommended and continually maintained and updated.
Verification
In my early copying days when a group of files had been copied to tape these files were checked visually, sizes compared and occasionally a file was removed and checked in VLC or MPEG Streamclip. I had been assured this was adequate behaviour for asset storage, and read online that “LTO uses an automatic verify-after-write technology to immediately check the data as it is being written”. Time was never available to add further verification checks – until recently – as space was critical on our storage infrastructure and priority had to be given to copying to LTO, as we struggled to find space for an increasing number of ProRes HD mezzanine copies from newly scanned films. In recent months I have been generating MD5 checksum manifests of directories prior to coping, and after the copies are completed the manifest is rechecked against the newly copied files using free scripts provided by Kieran O’Leary and the Irish Film Institute (more about this excellent resource here). If the md5 checksums match then that’s a perfect copy! If not, the faulty file is recopied and verified again.
Ejecting/powering down
Removing the tapes shouldn’t be undertaken until all spooling or winding has completed, the GUI copying has finished, and the ready light has returned to a steady green colour. Both GUIs have similar ‘unmount’ buttons that make the process simple and results in the tape being ejected from the drive. Un-mounting without GUI using command line doesn’t eject the tape so when things have gone quiet use the eject button on the front of the machines. The command line I use on the Ubuntu:
sudo umount /directory_mount_point/lto_folder
 The tapes should be returned to their boxes, stored in an upright position in a temperature and humidity controlled environment and the tape drives enclosed in the bags they ship in which protect them from dust build up and have antistatic properties (see right). No drive should have the power or SAS cable attached/removed when the other end is connected to a powered device, so ensure all computers are turned off at the wall before removing cables to/from the LTO tape drive. And don’t forget to wear that grounding wrist band every time you touch the drive!
Trash it, crash it, bash, reboot it…
4. Errors and problems
During the first year of writing to LTO some errors occurred that weren’t documented, but were generally caused by server connection failures or miscalculating package sizes when writing large collections of single files to tape. Unlike library systems you cannot write across multiple tapes, so anticipating available tape space is critical. Also, I’ve read that multiple LTFS indexes can use up space reducing the capacity of the LTO tape. Once I left 2.2TB (showing as total folder size) copying overnight to a newly formatted LTO6 tape. I wrongly assumed that the 200GB difference was insurance enough against allocation unit difference, but the copy failed and two folders weren’t copied. In addition I was unable to recover this tape and it had to be shelved as faulty. In time I’ve learnt to keep 300 GB spare and dribble copy smaller collections of files as the tape filled. It’s avoided this problem happening again.
Regrettably I’ve lost a couple of LTO6 tapes in the three years of operation. Two were accidentally over filled thereby rendering them unmountable, one was an undisclosed error – the deck just refused to work it after failing maintenance checks including a deep recovery check. I’ve read that you can re-use LTO tapes, having previously thought it was impossible. I will be testing the reformatting of these faulty tapes to see if I can reliably write to them. I wouldn’t reuse them for archival storage as I’m sure you would be inviting data problems rewriting over existing magnetic tape recordings, but they could be useful for other non-critical storage needs.

Connectivity
Mac OS X Mavericks is an unstable host to our spinning disk infrastructure (or drobos), compared to the Ubuntu and Z840 connections. They are connected via a 1Gb ethernet connection which is part of a larger university network that hosts our drobos. Ea ch time it drops out the drobo connections disappeared from desktop, causing a Finder error code -36 (see above). The LTO tape would also dismount, and the GUI would display a ‘ghost’ drive named after the tape. This ghost would need un-mounting, before the GUI was reconnected to the tape drive to enable re-loading and mounting the tape. Nine times out of 10 I’d have to run a tape ‘check volume’ repair in the maintenance panel (right) to rebuild the damaged index file so that it could mount to desktop. Maintenance checks creates an LTFS Lost and Found folder on the LTO tape when you have to run a full recovery.
Overloading
On one occasion I’ve experienced a tape dismount and LTFS error code -36 without being prompted by a drobo disconnection. On that particular day I’d set 279GB of data to transfer, not unusual. I wondered if too many other processor demands were occurring while also writing to LTO. It’s a daily occurrence for me to be running multiple jobs such as a bash ‘for loop’ batch converting folder contents using ffmpeg, exporting a handful of files from Adobe Media Encoder, and rewrapping MP4s with watermarks before sending out to clients – heavy work deadlines! In this instance, after removing the ghost drive and repairing and remounting the tape I continued by transferring smaller packet sizes of around 50GB in size between completing my other jobs.
Copy error
In a connected incident I left the Mac Pro working all weekend, on returning to my post and rebooting the system (to help performance speeds by resetting the Systems Management Controller) I tried to start copying from drobo to LTO tape just for repeated failures and tape dismounts. I haven’t an example of the error message, but it stated “The item 12345.mov can’t be copied because it is too large for the volume’s format”. It would always pick the first item in the collection of files I was sending, and there was always ample space available on the tape. The only way to move on I found was to disconnect and reconnect to the drobo’s uni server connection and/or reboot the Mac.
Accidental deletion
Our drobos are accessible to others in the office besides myself. An error code -51, accompanied by a LTO tape crash occurred after a group of files sent to copy to LTO tape had one of the items deleted mid way through by a MACE curator during routine
database work. The system needed its usual reset and work carried on okay.
Error codes
After an overnight copying session I returned to discover the model C drive had completed the copies but then ejected the tape on its own. It was showing an error code ‘6’ and a ‘!’ on the front, which is a tape drive or media error. Some forums suggested others have remedied the issue by instigating a tape clean, so I ran one and the problem hasn’t yet returned. There are alternative diagnostic tests to run according to the Model C User’s Guide, which I didn’t complete, but will if it happens again. The last couple of times I’ve used the model C drive I’ve noticed it displays warnings after being switched on which clear after a minute. They are ‘e’ (encryption error) and ‘8’ (interfacing problems), which flicker a few times then clear to just the green ‘ready’ light. I recently downloaded XTalk to the Mac to assist in evaluating drive health, and again there are diagnostic test that can be run using the deck’s maintenance modes. As yet there’s been no time to run these tests, but they will begin in coming months
Tape fault / Spooling
The GUI/model B drive on the Z840 usually operate faultlessly but I have had a couple of recent incidents, firstly when copying froze approximately 5% in. I couldn’t force the software to close or restart. I was exporting a MOV form Da Vinci Resolve at the same time, and once completed I had to reboot the Z840 and the tape drive. Despite maintenance checks and deep recovery on the LTO6 tape (via the model B and model C drive) I was unable to restore the tape and have to conclude that a tape error most likely caused this fault. The second documented fault I’ve experienced with model B / Z840 combo, and possibly related to the first, was earlier this month when a tape refused to mount sticking in the final 5% of loading for over an hour, the drive repeatedly spooling the tape. I unmounted and removed the tape after forcing the GUI to quit. Further write jobs with different tapes have worked fine from the Z840 and model B. The problem tape also loaded fine on the Ubuntu with the model C drive, so unsure what could have caused this error.
Upgrades
I’ve recently upgraded the MacPro 5,1 to High Sierra and the same disconnections still occur, though usually now just between 5pm and 1am which is a problem as this prevents me leaving things copying overnight. I’ve had additional permission problems to deal with and need to run a short ‘sudo chmod go+w /Volumes’ command in terminal before being able to mount any tape. I’ve reset user permissions this week and haven’t had a chance to check if this has been fixed – I understand increased permissions are causing lots of problems with MacOS High Sierra. Sadly I can’t upgrade beyond HS as the GPU doesn’t support Metal, and I’ll lose access to software I need everyday.
Solution?
As alluded to in chapter 2, it seems many of my MacPro/model C drive copy issues could be down to receiving the wrong PCI SAS card. We ordered an ATTO H680, but on recent inspection I found that we received/installed an ATTO R680. A few friends were recently debating LTO read/write errors on Twitter and highlighted the issue of lack of support for Transport Layer Retries (TLR) in some PCI SAS cards, which led me to discover our problem. Transport Layer Retries are designed to catch errors and initiate retries when reading from LTO6 (for larger data amounts), LTO7 and LTO8 tapes. According to ATTO’s website, SAS links such as the R680 will be automatically slowed from 6Gb/s to 3Gb/s to reduce the frequency of read errors with LTO drives. I now wonder if this problem has been behind many of the frustrations with the MacPro connections. ATTO recommends that these PCI SAS cards aren’t used with LTO6 + tape drives (you can read more on ATTO’s FAQ here). I hope we will replace this card in coming months and see if any of the earlier problems continue. For the time being I’ll be using just the Ubuntu/Z840 for the LTO writing.
When it comes to identifying errors I recommend viewing the GUI trace panel which provides verbatim diagnostic outputs of the processes happening during any LTO operation and allows you to see when and where problems have occurred. Errors appear red in trace, and can be used to efficiently search for resolutions to issues online. This is only available on the MacPro GUI, Quantum LTFS Manager, but can be run from command line also using the ltfsck options, which include –trace to enable diagnostic outputs. You should read more here on the AMIAopensource LTFS guide for archivists.
___________________________________________________________
For more information take a look at the following links:
Half Height Model C documentation from Quantum:
http://downloads.quantum.com/lto6hh/Model-C/6-68132-01_Quantum_LTO-6_HH_SAS_Model_C_User%E2%80%99s_Guide.pdf
LTFS on Wikipedia:
https://en.wikipedia.org/wiki/Linear_Tape-Open
Download LTFS from Quantum:
https://www.quantum.com/serviceandsupport/softwareanddocumentationdownloads/ltfs/index.aspx?whattab=Third
AMIAopensource LTFS for archivers:
https://github.com/amiaopensource/ltfs/blob/master/README
AMIAopensource LTOpers:
https://github.com/amiaopensource/ltopers
Irish Film Institute IFISCRIPTS on GitHub:
https://github.com/kieranjol/IFIscripts
https://ifiscripts.readthedocs.io/en/latest/index.html
FFV1 and Matroska / RAWcooked:
https://en.wikipedia.org/wiki/FFV1
https://kieranjol.wordpress.com/2016/10/07/introduction-to-ffv1-and-matroska-for-film-scans/
https://mediaarea.net/RAWcooked
Yoyotta repairing LTFS, useful information about the indexing of LTFS tapes: https://yoyotta.com/help/repairLTFS.html
Yoyotta LTO and LTFS FAQ
https://yoyotta.com/help/LTO_FAQ.html
Strongbox LTFS library:
http://www.cckmedia.com/Strongbox2
NoTimeToWait Conferences are held annually in different locations around the World. If you’re interested in innovative, mostly open source digital preservation solutions (that can be brilliantly creative) then you should make sure you attend online, or even better in person: https://mediaarea.net/NoTimeToWait
Complete (and correct) lyrics for Technologic, by Daft Punk:
https://www.google.com/search?client=firefox-b-ab&q=technologic+lyrics

This is an excellent post, thank you! Awesome information.
I don’t work with LTO, but I’m a big rsync fan – I think you’ll find it a great tool.
LikeLiked by 1 person
interesting read, I have been playing with LTO for quite a while, even the first quantum mxf aware drive that should have been able to do partial restore ! There are a lot of intricacies involved in LTO technology which the further you work with them the worst it gets, also the brands themselves are a bit grey themselves when it comes to technical specifications, the desktop models although cheaper do have there own little problems !
LikeLike
Hey Marc, thanks for the reply. It sounds as if you have some immense knowledge that would be useful! Fancy a wee blogging spree? 😀
LikeLike
well in this industry nobody has immense knowledge, a lot of specialists though and a lot of people who think they know 😉 I am not much of a blogger as it’s to time consuming but will always try to help out !
LikeLiked by 1 person
Great article. You are correct that for reliable operation with LTO + LTFS you do need the ATTO H680 rather than the R680.
Quantum used to use an HPE drive mechanism, then they moved to an IBM drive, so standard LTFS won’t be able to control the different brands at once. Our company YoYotta recompile the LTFS framework for macOS so that it can support a mix of drive types. Then you can control both simultaneously. Sorry we can’t help out with Windows !
LikeLike
Thanks for the article – interesting reading. Have you any experience with LTFS on Windows 2019? I’m struggling to find a version that works with Windows 2019.
Thanks Again
LikeLike
I can’t tell you how much I hate this desktop LTO system. I don’t care if these things are supposed to last 30 years. the supporting software and machines running the decks don’t last that long. I truely believe we’ll be in a situation similar to VHS or Betamax. The tapes will work fine, but good luck finding a system to recover from them.
LikeLike